How to Successfully Bind Your Quilt: 5 Techniques to Try (with Pictures)
- Jennifer Herron
- Apr 21, 2025
- 3 min read
Updated: Sep 15, 2025
Binding your quilt, or any sewing project, is an essential last step. This means you have finished the quilt, and it can be used, washed, and loved for years to come.
There are many ways of doing this last step. So here are 5 mini guides on how to bind a quilt.
Please note that each step may require different tools or supplies. I have included some affiliate links for those.
For most projects, binding id done with bias cut strips of fabric. However I don't cut my quilting binding on the bias, I just do straight cuts from edge to edge.
I have finished a quilt using both methods, and haven't found a big enough difference, to warrant bias cutting. Since bias cutting usually takes more fabric.
Method 1: Cut, Iron Sew
This method required no special equipment. Just fabric, iron, sewing machine & clips or pins.
1) Cut your fabric into 1.5" strips & sew them together on a 45 degree angle
2)Fold the strip in half, and iron
3)Fold one edge towards the center line, and iron
4) Fold other edge towards the center line and iron
5) Iron the center folded up again, with the edges folded
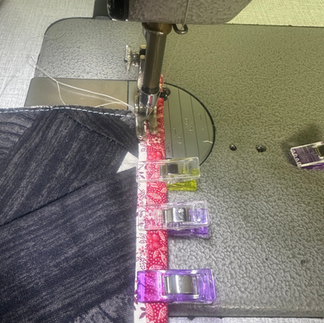
6) Clip or Pin the binding to your quilt, so the center fold is at the edge of the project
7) Sew down the binding. This can be one straight stitch at the edge or a Zigzag stitch or any other fancy stitch you machine may do


Method 2: Cut, Some Ironing Sew
This method is a bit similar to one, but uses one tool - A Fabric Bias Maker
You can grab a whole set of those, using this link
1) Cut your fabric into 1.5" strips & sew them together on a 45 degree angle
2) Feed Fabric thru the bias maker and iron down the folds, as you pull
3) Fold in half, and iron the center fold, with edges folded
4) Clip or Pin the binding to your quilt, so the center fold is at the edge of the project
5) Sew down the binding. This can be one straight stitch at the edge or a Zigzag stitch or any other fancy stitch you machine may do


Method 3: Cut, Sew, Fold n Sew
Maybe your iron broke or you hate using it. So this method could be made done without an iron
1) Cut your fabric into 1.5" strips & sew them together on a 45 degree angle
2) Sewing right sides together, Sew the edge of your binding to the edge of your quilt. 1/4" seam allowance
3) Fold the un-sewn edge of you binding towards the center, and wrap it to the top of you quilt, securing with clips
4) Stitch the top of the quilting, binding at the edge, or a Zigzag stitch or any other fancy stitch you machine may do.


Method 4: 2 Fabric, Sew, Sew, Fold n Sew
Maybe you want a the smallest pop of colour in your project, and/or want to be a little fancy
1) Cut 2 fabric for your strips - One being 1.5" and the pop of colour being 1.75" (1 3/4")
2 Sew each fabric strips into your long strips
3) Sew each fabric together and a 1/4" seam allowance
4) Iron the seam allowance towards the 1.5" strip
5) Fold the strip in half, and iron
6) Sew the edges of the strips, with the pop of colour fabric facing you, to the back of your quilt at a 1/2" seam allowance
7) Fold the un-sewn edge of you binding towards the center, and wrap it to the top of you quilt, securing with clips
8) Stitch in the ditch, along the pop of colour fabric seam.


Method 5: Cut n Sew
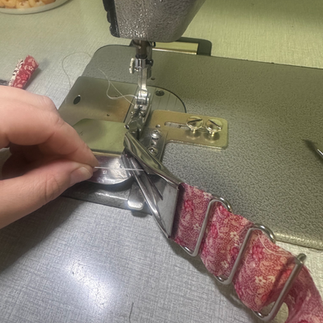
By far my most used binding method. If you have an industrial machine, you can use attachment, to make binding a breeze. Get the attachment here
1) Cut your fabric into 1.5" strips & sew them together on a 45 degree angle
2) Thread fabric into the Double Fold bias binder
3) Sew the binding onto the quilt


Comments