Fabric Gift Bags - How to make your own
- Jennifer Herron
- Nov 1, 2025
- 4 min read

Fabric gifts bags are not only easy to make, but they check a lot of the eco friendly boxes. They are reusable, for many years to come, washable, and repairable. Plus you can make them in varies sizes, and use ribbon, lace, etc to decorate the bags.
I like adding a couple sheets of tissue paper to gifts for kids, just so they get the joy of ripping something out of the paper.
The gift bag being shown here is made from a 1/2 meter of quilt cotton. However you can scale this up, for larger bags, and scale down for smaller bags. I like using 1/2 meters cuts of fabric, cause I the results bag is a decent size for most gifts
Supplies
Fabric - 100% quilting cotton
Thread
Iron
Spray Starch - is not need but recommended
Heat erase chalk or pen
Ribbon for tie
Prep work
Like every good project there is prep work. Usually this means washing fabric and ironing it flat before cutting out a pattern. Which is the same here, except sometimes I don't pre-wash my quilting cotton. There is just a bit more ironing before we get to the sewing machine.
Since I use the whole cut of fabric, from selvage to selvage, I don't have a pattern that you can pin onto the fabric and use that to cut out. However, this means all the fabric is used. Except the tiny bit to clean up your ends.


Chalk Marking/Ironing
Straighten/clean up the edges of the fabric.
Using chalk draws two lines, each 1 inch wide from one of the non selvage edges of fabric
Draw 1 inch wide lines down each selvage side
Iron the 2 Selvage Edges. The chalk line is the fold over, and the selvage is now on the wrong side of the a fabric
Take care when coming up to the edge with 2 chalk lines, that you don't erase those to much.
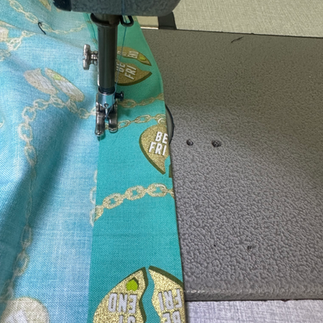
French Seam
So there is now 3 sides of the fabric with chalk lines, and one side that is free of chalk. Which should be a non selvage edge or raw edge of fabric. Thats the side that gets a french seam.
If you have never French seam before, its easy and I will admit kinda my favourite.
How to French Seam
With wrong sides together, fold the fabric in half, to the raw/unchalked edge is one.
Start at the end of the fabric, to the corners line up and stitch at a 1/4 inch seam allowance
Trim the seam allowance about half
Iron the seam, and turn over, so right sides are together. Press again,
Sew the seam again, at 1/4 inch seam allowance. Encasing the raw edge in the pocket between the 2 seams.


Iron the 2 chalk lines
So no we have piece of fabric that has been folded in half. Had a french seam on one side, selvages ironed in and one raw edge with 2 chalk lines
Next step is to iron the side with 2 chalk lines. Those are the fold lines again, so that edge of fabric is double folded.
You will notice that the selvage edges are in the way of double fold, which is fine. Do you double fold, well keeping the selvage edge folded.
Sewing & Adding Ribbon
Now its time to sew the double folded side of the fabric. There is 2 choices - One stitch or 2 stitch One Stitch - Keep the double fold, and do 1 edge stitch along the bottom edge, making a neat tube for the ribbon later.
Two Stitch - Unfold the double fold, to expose the first fold. Edge stitch along the bottom edge. Then refold again, and do the edge stitch on the bottom edge.
(I prefer the 2 stitch method, there is less chance of the folds shifting, and a better chance of neat finish.)
Its time to do the last seam of the bag. with the back inside out, so the right sides are together. Line the 2 selvage folds together and stitch at 1/4 seam allowance. Starting at the edge Stitch, and down to the fold in the fabric
Give the project one last iron over, to make sure all those chalk lines are gone.
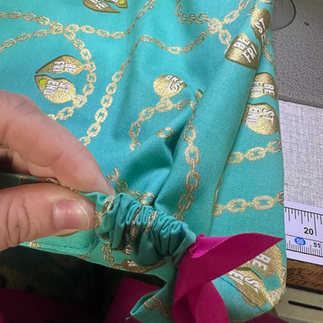
Lastly its time to add the ribbon for the tie back. At minimum cut a length of ribbon that is 5 inches longer total length of the tube.
Use a safety pin to worm the ribbon thru the tube.
I recommend that you seal the edges of your ribbon with a touch of heat, just enough to melt the tiniest edge on the ribbon. So it wont fray.


I hope you enjoyed this tutorial on how I make my gift bags. I have tried a few different patterns, and figured out this was the easiest, and fastest way to make bags that last. I usually wash my bags every few uses, or if they get dirty.
For the gift bags that are used during the Holiday season. I wash those at the start of every holiday season. Since the bags are used to also store my decorations. They are get for wrapping up breakable things, as they can placed inside the bag and wrapped up.


Comments